2024-09-13
La création d'une fenêtre tambour, en utilisant des panneaux de bois flexibles et roulables avec rainures en V (panneaux tambour), implique plusieurs étapes.
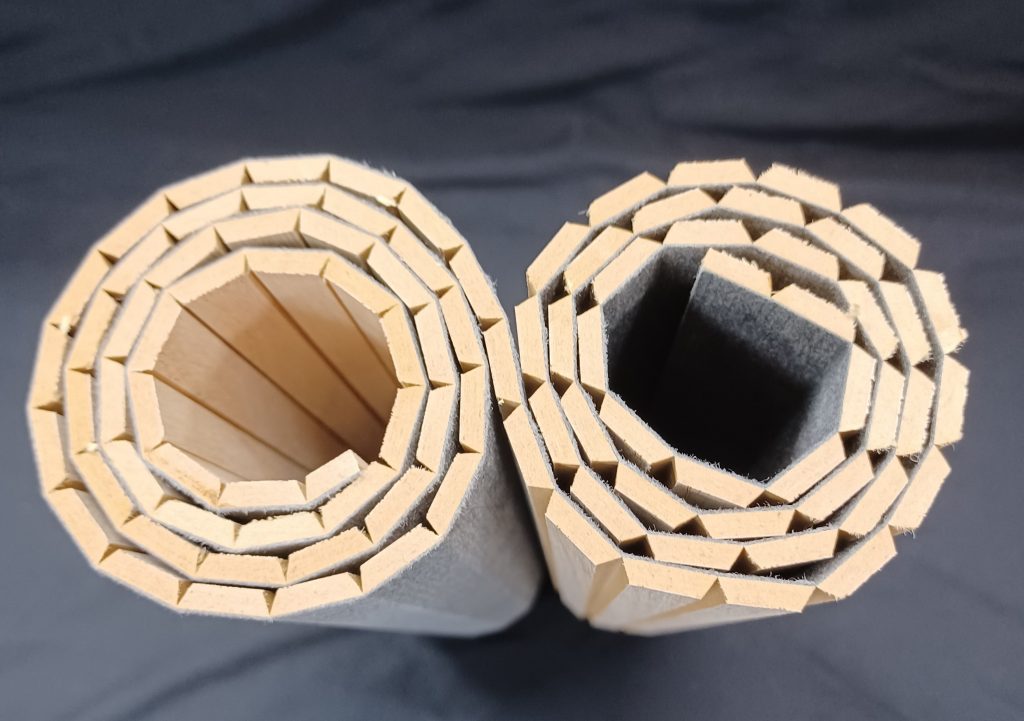
Fiche technique des panneaux de bois flexibles et roulables (panneaux tambour)
Panneau mural à lattes de bois flexibles avec dessus en placage de bois
Types de bois : Chêne, Érable, Cerisier et panneau MDF
Taille : 4 pieds x 8 pieds (1200 mm x 2400 mm)
Épaisseur : 3 mm
Lattes plates avec rainure en V : 13 mm, 43 mm, 67 mm et autres largeurs pour commandes spéciales
Structure : Couche supérieure Placage de bois Couche intermédiaire Panneau MDF Couche inférieure Support en tissu non tissé renforcé de résine ECO ou papier kraft
Usages : fenêtre tambour, porte tambour, enveloppes de poteaux intérieurs et couverture de colonnes, revêtement mural en bois, plafond, couvertures de surfaces de meubles, revêtements de sol, lambris, panneaux tambour en bois flexibles et roulables, panneaux tambour, panneaux de bois flexibles et roulables avec rainures en V, panneaux de bois flexibles, bricolage
Origine : Fabriqué à Taïwan
Guide pour installer une fenêtre à tambour chez soi en bricolage
Matériaux et outils :
- Panneaux en bois flexibles et enroulables rainurés en V (panneaux tambour) : Les meilleurs panneaux tambour (panneaux en bois flexibles et enroulables) sont constitués de trois couches flexibles avec rainures en V. La couche supérieure est en placage de bois sélectionné, la couche intermédiaire en panneau MDF, et l'arrière est soutenu par un textile. Les deux couches supérieures sont rainurées en V ou cannelées pour offrir flexibilité et enroulabilité, et le design à lames en fait le meilleur choix pour ce matériau de fenêtre tambour. Les panneaux en bois flexibles en trois couches, avec une couche supérieure en placage de bois sélectionné, une couche intermédiaire en MDF et un support textile à l’arrière, sont conçus pour une flexibilité, une enroulabilité et une durabilité accrues, toujours le premier choix pour la fabrication de fenêtres tambour.
- Rails de montage pour panneaux tambour (panneaux en bois flexibles et enroulables)
- Kit de quincaillerie pour porte à tambour (comprenant des rails, un tissu de tambour, etc.)
- Mètre ruban
- Scie
- Tournevis
- Crayon
- Colle à bois
- Papier de verre
- Finition (peinture ou teinture)
Étapes pour installer une fenêtre à tambour chez soi en bricolage
- Mesurer et couper les panneaux tambour flexibles et enroulables (panneaux en bois flexibles et enroulables)
- Mesurez les dimensions de votre cadre de fenêtre où vous souhaitez installer la fenêtre à tambour.
- Découpez les panneaux en bois flexibles rainurés en V (panneaux de tambour) pour les adapter aux dimensions du cadre de la fenêtre.
- Préparer les panneaux tambour (panneaux en bois flexibles et enroulables)
- Poncer les bords et surfaces des panneaux tambour (panneaux en bois flexibles et enroulables) pour assurer la douceur
- Appliquer une finition (peinture ou teinture) sur les panneaux tambour (panneaux en bois flexibles et enroulables), si désiré. Laissez sécher
- Installez les rails de montage.
- Installez les rails de montage sur les côtés du cadre de la fenêtre. Ces rails guideront le mouvement des panneaux tambour (panneaux en bois flexibles et enroulables).
- Attachez le tissu de tambour.
- Certains kits de quincaillerie pour portes tambour sont fournis avec un tissu tambour. Fixez le tissu tambour à l'arrière des panneaux tambour (panneaux en bois flexibles et enroulables) en veillant à ce qu'il soit bien aligné.
- Installer des panneaux Tambour (panneaux en bois flexibles et enroulables)
- Insérez soigneusement les panneaux de tambour dans les rails de montage, en commençant par le bas et en les faisant glisser en place.
- Tester et ajuster
- Faites glisser les panneaux tambour (panneaux en bois flexibles et enroulables) vers le haut et vers le bas pour tester leur mouvement. Apportez les ajustements nécessaires pour garantir un fonctionnement fluide.
- Fixez les panneaux tambour (panneaux en bois flexibles et enroulables)
- Une fois satisfait du mouvement, fixez les planches de tambour en place à l'aide de colle à bois ou d'autres dispositifs de fixation appropriés.
- Finitions
- Assurez-vous que la fenêtre à tambour fonctionne en douceur. Appliquez les dernières finitions, telles que l'ajout de poignées ou de tirettes pour une utilisation facile.
En suivant ces étapes, vous pouvez créer un Fenêtre à tambour utilisant des panneaux en bois flexibles et enroulables rainurés en V (panneaux tambour) N'oubliez pas de choisir soigneusement le matériel et la finition appropriés pour atteindre l'esthétique et la fonctionnalité souhaitées.
Mots clés Fenêtre à tambour, porte à tambour, panneaux tambour en bois flexibles et enroulables, panneaux tambour, panneaux en bois flexibles et enroulables rainurés en V, panneaux en bois flexibles, bricolage